Mastering the Coping Saw: A Comprehensive Guide
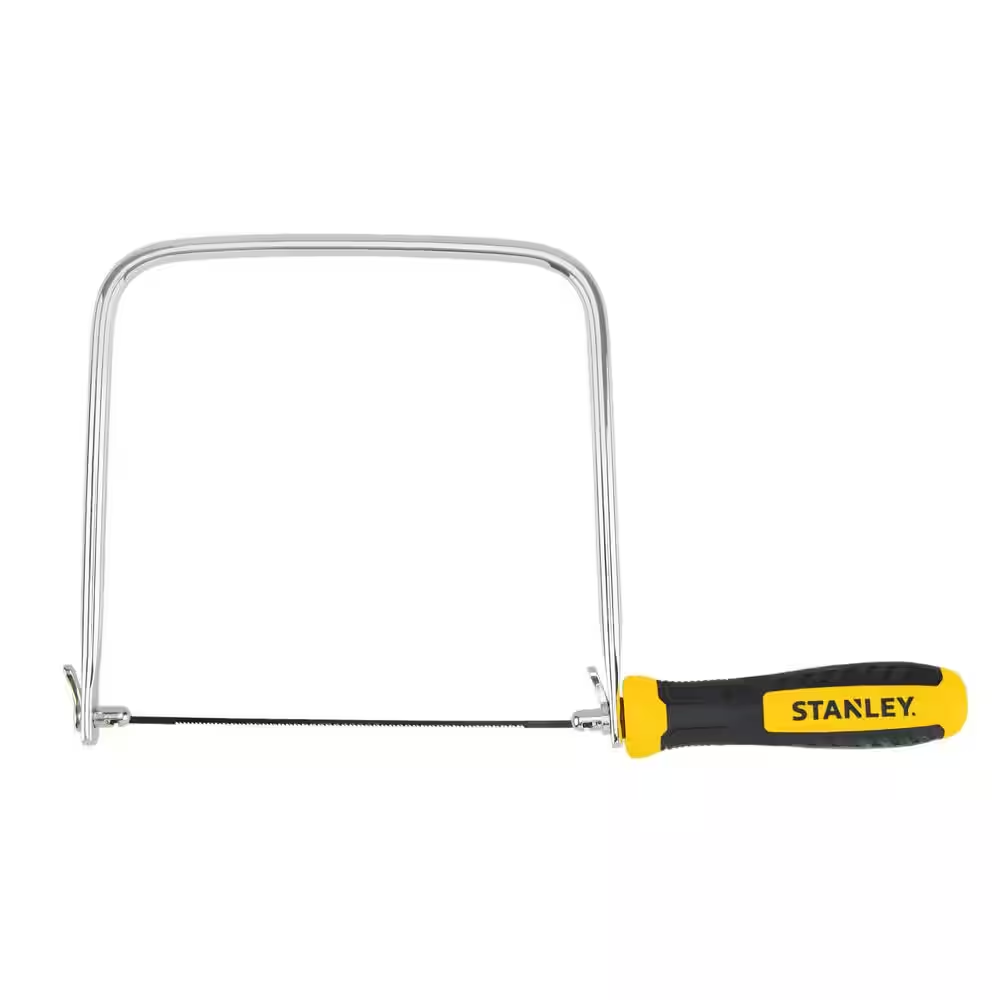
A coping saw is a hand-held tool that’s essential for making intricate cuts in wood and other materials. It’s characterized by its U-shaped frame and a thin, replaceable blade. While it might seem simple, the coping saw is a versatile tool that can handle a wide range of tasks.
The Anatomy of a Coping Saw
Before diving into using the coping saw, it’s crucial to understand its components. The frame houses the blade and provides tension. The blade, the heart of the tool, comes in various sizes and tooth configurations for different materials. The handle offers grip and control.
Choosing the Right Coping Saw
Selecting the right coping saw is the first step to success. Consider the type of work you’ll be doing. For delicate tasks, a smaller saw with a finer blade is ideal. For thicker materials, a larger saw with a coarser blade might be necessary.
Blade Selection: The Cutting Edge
The blade significantly impacts the quality of your cuts. Fine-tooth blades are best for intricate work, while coarser blades are suitable for rough cuts. Always ensure the blade is securely fastened to prevent accidents.

Safety First: Essential Precautions
Safety should always be a priority. Wear safety glasses to protect your eyes from flying debris. Use a push stick to guide the workpiece, especially when cutting small pieces. Clamp your workpiece securely to prevent movement.
Basic Coping Saw Techniques
- Holding the Saw: Grip the handle firmly, allowing your fingers to guide the blade.
- Applying Pressure: Apply gentle pressure as you cut. Excessive force can break the blade.
- Making Turns: For curves, turn the workpiece rather than forcing the blade.
- Cutting in Tight Spaces: Use a push stick to guide the workpiece in tight areas.
Common Coping Saw Mistakes and How to Avoid Them
- Blade breakage: This often occurs due to excessive pressure or improper blade tension.
- Inaccurate cuts: Ensure the blade is perpendicular to the workpiece for precise cuts.
- Difficulty making turns: Practice and patience are key. Turn the workpiece gradually.
Mastering the Art of Coping Joints
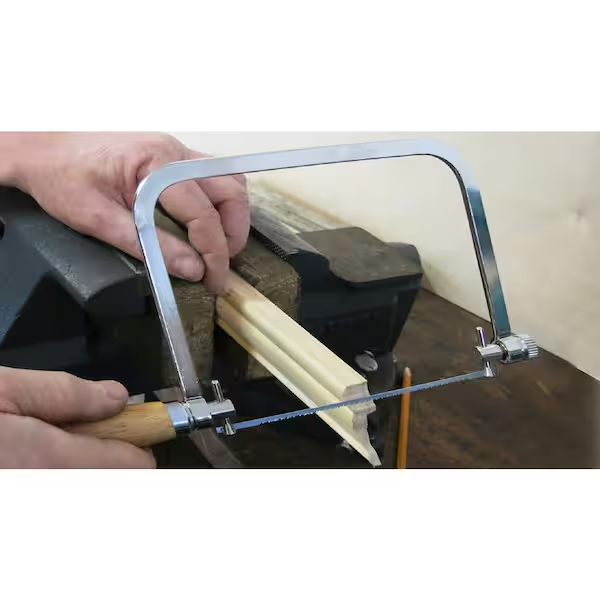
One of the most common uses for a coping saw is creating coping joints in woodwork. This joint is essential for creating seamless corners in molding and trim. The process involves scribing one piece of molding to fit the other and then using the coping saw to remove the excess material.

Beyond Coping Joints: Other Applications
The coping saw is not limited to coping joints. It’s a valuable tool for a variety of tasks:
- Cutting intricate shapes in wood
- Creating decorative elements
- Removing material from tight spaces
- Working with plastics and other materials (with appropriate blades)
Tips for Coping Saw Maintenance
Proper maintenance extends the life of your coping saw:
- Clean the blade after use to prevent rust.
- Store the saw in a safe place to protect it from damage.
- Replace worn or damaged blades promptly.
Coping Saw Alternatives: When to Use Other Tools
While the coping saw is excellent for many tasks, there are situations where other tools might be more suitable:
- For straight cuts, a handsaw or circular saw is often faster.
- For large-scale curved cuts, a jigsaw might be more efficient.
- For delicate metalwork, a hacksaw might be the better choice.
Applying too much pressure
Applying excessive pressure when using a coping saw is a common mistake with significant consequences.
Why Too Much Pressure is Problematic
- Blade breakage: The most obvious risk is snapping the blade. The delicate nature of the coping saw blade means it’s easily overwhelmed by excessive force.
- Inaccurate cuts: Overly forceful pressure can cause the blade to deviate from the cut line, resulting in uneven or crooked cuts.
- Fatigue: Applying too much pressure can quickly tire your hand and arm, reducing control and increasing the risk of accidents.
Finding the Right Balance
The key to successful coping saw use is to let the blade do the work.
- Gentle pressure: Apply just enough pressure to guide the saw. Think of it as coaxing the blade through the material rather than forcing it.
- Short, controlled strokes: Instead of long, powerful pushes, use shorter, more controlled strokes. This helps maintain precision and reduces stress on the blade.
- Blade tension: Ensure the blade is tensioned correctly. A properly tensioned blade will cut more efficiently and reduce the need for excessive pressure.
Practice Makes Perfect
Developing the right amount of pressure takes practice. Start with softer woods and gradually increase the challenge as you gain confidence. Remember, patience is key.
Not following the line
One of the most common challenges when using a coping saw is maintaining accuracy. Drifting from the cut line can ruin the project. Here are some tips to help you stay on track:
The Importance of a Clear Line
A crisp, visible line is essential for accurate cutting.
- Sharp pencil: Use a sharp pencil to create a clear, thin line.
- Marking gauge: For precise measurements and consistent lines, consider using a marking gauge.
- Contrast: If the wood is dark, use a white pencil or chalk.
Blade Alignment and Angle
The blade’s position and angle significantly impact cut accuracy.
- Perpendicular blade: Ensure the blade is perpendicular to the workpiece.
- Blade tension: Maintain proper blade tension for smooth cuts.
- Gentle pressure: Avoid excessive pressure that can force the blade off course.
Turning the Workpiece, Not the Saw
To make curves, turn the workpiece rather than forcing the blade. This helps maintain control and prevents the blade from binding.
Practice and Patience
Like any skill, mastering the coping saw takes time and practice. Start with simple projects and gradually increase the complexity.
Common Pitfalls and Solutions
- Overcutting: This often happens when applying too much pressure. Reduce pressure and focus on small, controlled strokes.
- Undcutting: This can occur if the blade is dull or the tension is too loose. Replace the blade or increase tension as needed.
By following these tips and practicing regularly, you’ll significantly improve your ability to make accurate cuts with a coping saw.
Rushing the cutting process
One of the most frequent errors made when using a coping saw is rushing the cutting process. It’s tempting to hurry, especially when you’re eager to see the project take shape. However, haste often leads to mistakes and frustrations.
The Importance of Patience
Patience is a virtue when using a coping saw. The delicate nature of the blade and the intricacies of many cuts demand a steady hand and a calm demeanor. Rushing can lead to several problems:
- Blade breakage: Applying excessive pressure in an attempt to speed up the process can cause the blade to snap. This is not only frustrating but also dangerous.
- Inaccurate cuts: Hurrying can result in uneven or crooked cuts, which can ruin the appearance of your project.
- Fatigue: Rushing can lead to hand fatigue, making it harder to maintain control of the saw and increasing the risk of accidents.
Techniques for a Steady Pace
To avoid rushing, focus on developing a steady rhythm to your cutting.
- Short, deliberate strokes: Instead of trying to remove large amounts of material at once, take small, controlled cuts.
- Regular breaks: If you find yourself getting impatient or tired, take short breaks to rest your hands and clear your mind.
- Visualize the cut: Before starting a cut, visualize the desired shape. This mental preparation can help you stay focused and avoid errors.
Practice Makes Perfect
Improving your coping saw skills takes time and practice. By focusing on patience, technique, and safety, you’ll gradually increase your speed and accuracy. Remember, a well-executed cut is always better than a rushed and imperfect one.
The coping saw is a simple yet versatile tool that can be a valuable addition to any woodworking or DIY enthusiast’s arsenal. With practice and proper technique, you can master this tool and create beautiful projects. Remember, safety should always be your top priority.





Leave a Reply