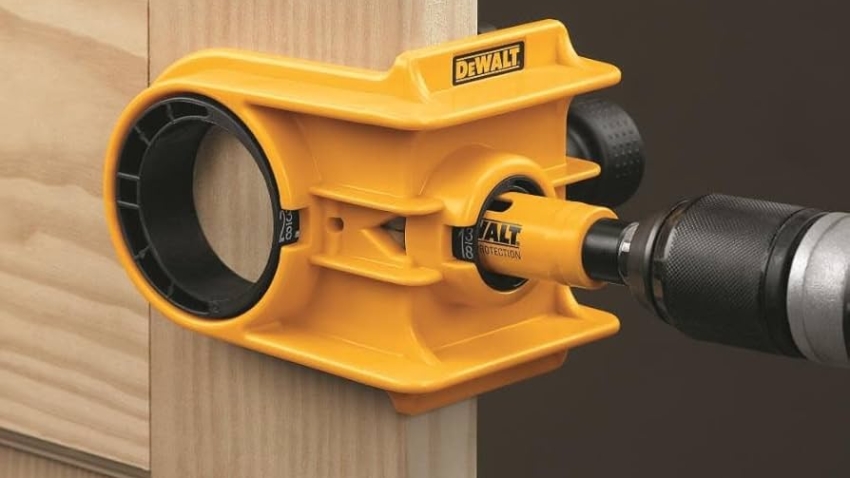
How to Select the Right Hole Saw for Door Knob Installation
Essential Tools and Materials for Lockset Installation
Before you start installing a new door lockset, make sure you have all the right tools and materials. This will make the task easier and ensure a successful install.
Tools required for installing a door lockset
To install a door lockset, gather these tools:
- A tape measure for precise measurements.
- A chisel to carve out the latch plate area.
- A hammer to drive in screws and chisel out material.
- A drill/driver to make holes for the lock.
- Hole saw bits in 1-inch and 2 1/8-inch sizes for drilling the face and edge holes.
Having the right tools on hand will prevent delays and ensure quality work.
Materials to gather before starting the project
In addition to tools, you will need several materials:
- A door lockset kit that includes all the necessary components.
- Screws to secure the lockset and latch.
- A lubricant to apply to the lock mechanism for smooth operation.
- A pencil to mark where you need to drill.
Ensure you have these materials ready before beginning the installation. This will save time and help avoid mid-project runs to the hardware store.
Store the tools and materials near the work area to keep them within easy reach. It’s best to check the lockset kit beforehand to confirm that it contains all the needed parts.
Preparing for a Lockset Installation
Good preparation is key to installing a lockset smoothly and effectively. From choosing the right lockset to organizing your workspace, ensure each step is thorough to avoid issues later on.
Selecting the appropriate lockset for your door
Before you start, pick a lockset that fits your door well. Think about these points:
- The level of security you want. For basic needs, a grade three lock is fine, but you can get something stronger.
- Check your door thickness. Standard interior doors are usually thinner than exterior ones. Make sure the lockset works with yours.
- If it’s a replacement, measure the existing holes. A new lockset that matches these will be easier to install.
- Choose a lockset style and finish that looks good with your home’s decor.
- Confirm that the lockset package has all parts before you begin work.
Preparing your workspace effectively
Before drilling starts, set up your space right. Here’s what to do:
- Move anything in the way around the door out of the space.
- Lay down a drop cloth to catch dust and bits of wood.
- Have all tools close by to keep the work going without stops.
Take these steps seriously, and you’re all set for a neat and successful lockset installation.

Proper Measuring and Marking Techniques
When installing a lockset, correct measuring and marking is critical. It ensures your lock fits and works well.
Accurate measurements for lockset compatibility
To start, you must get the door thickness right. Use a tape measure for this. Your lockset should match the door’s standard thickness to work well. If you’re replacing a lock, note the size and placement of existing holes. This helps the new lockset fit without extra drilling. Check the backset too; it’s the distance from the door edge to the hole’s center. Make sure the new lock lines up with this.
Utilizing a door lock installation template
A template saves time and prevents mistakes. Many locksets come with one, or you can buy or make one. It shows where to mark the door for drilling. Place the template on the door at the height you need (often 36 inches from the floor). Then, mark the spots precisely. This guides you when you drill, for a smoother install.

Drilling the Holes for the Lockset
Drilling the holes accurately is crucial for a secure and functional lockset installation. This section will guide you through drilling the main holes required: the face hole and the edge bore.
Techniques for boring the face hole cleanly
When drilling the face hole, precision is key to preventing door damage. Start by fixing the position with a pencil mark using your installation template. Attach a 2 1/8-inch hole saw bit to your drill. Ensure the drill is perfectly perpendicular to the door surface to maintain alignment. Begin drilling at a steady speed from one side of the door and pause midway. Continue drilling from the other side to complete the hole. This method avoids the wood from splintering, ensuring a clean finish.
Creating the edge bore with precision
The edge bore houses the latch mechanism and needs accurate placement. Switch to a 1-inch hole saw bit for this step. Align the drill with your mark on the door edge. Drill slowly to maintain control and prevent the drill from veering off the mark. Ensuring that the edge bore aligns with the face hole is crucial, as any misalignment can hinder the latch’s functionality. After drilling, use a chisel to refine the edges of the hole, ensuring the latch can fit snugly.
Ensuring Proper Alignment of Lockset Components
Once you’ve drilled the holes for your door lockset, it’s critical to ensure everything lines up properly. Proper alignment is vital for the lockset to function correctly and for the install to look professional.
Verifying alignment post-drilling
After creating the face hole and edge bore, check their alignment:
- Insert the latch into the edge bore to see if it aligns with the face hole.
- Ensure the latch slides smoothly and sits flush against the edge of the door.
- Look for gaps or misalignments where the lockset components will fit.
This visual and physical check confirms that the lock and latch will work together smoothly.
Adjusting drilled holes for misalignments
If you find any misalignments, it’s time to make adjustments:
- Use a file or chisel to slightly enlarge the holes, but be careful not to make them too loose.
- You may need to reposition the latch plate area for a flush fit.
- Re-check the alignment by inserting the lockset components again.
Small alterations can make a big difference in ensuring your lockset operates as it should. Take the time to make these fine adjustments before moving on to the next step of the installation.
Installing the Door Latch Successfully
To ensure your door’s security, a properly installed door latch is essential. The latch is what will catch in the strike plate, keeping the door closed when the knob is turned.
Chiseling a recess for the latch plate
Carving a recess for the latch plate is a crucial step for a flush finish:
- Place the latch bolt into the edge bore to outline where the latch plate will sit.
- Use a chisel to carefully remove wood within the traced outline, creating a shallow cut.
- Keep chiseling until the latch plate fits snug and level with the door edge.
- It’s important to keep checking the fit as you work to avoid over-chiseling.
Don’t rush this step as a properly chiseled recess is key for the door latch to operate smoothly.
Securing the latch mechanism correctly
Installing the latch mechanism correctly ensures smooth locking and unlocking:
- Slide the latch into the chiseled area until it’s fully seated.
- The curved side of the latch should face the direction the door closes.
- Fasten the latch with screws, making sure it’s secure but not overtightened.
- Test the latch by pressing it in and letting it spring out.
If the latch sticks or doesn’t move freely, it may need slight adjustment to ensure proper functionality. Regular checks and adjustments will keep the latch working properly for years to come.

Mounting and Assembling the Lockset
Once you have prepared the door and drilled the necessary holes, the next step is to mount and assemble the lockset components. With careful attention, you can ensure a secure and properly functioning door lock.
Steps to assemble the lockset on the door
To assemble the lockset properly, follow these steps:
- Insert the outside part of the lockset through the face hole you prepared.
- Make sure the spindle part of the lockset connects with the latch inside.
- On the door’s inside, put the other part of the lockset onto the spindle.
- Line up the screw holes between both sides of the lockset.
- Fasten the two halves with screws that come in the kit.
Handle each step diligently to avoid messing up the mechanism’s alignment.
Securing and ensuring smooth operation
After assembling the lockset, take special care to check its operation:
- Turn the handle and make sure it moves smoothly without any stickiness.
- Lock and unlock the door to test if the mechanism works effortlessly.
- Open and close the door to see if it latches without problems.
- If you find any issues, loosen the screws a little and adjust as needed.
Checking these aspects can ensure that your door lock works well and provides security for a long time. Always test multiple times to be confident in the lock’s function.
Finishing Touches and Lock Maintenance
After you’ve mounted the lockset, there are a few finishing touches that need attention for the installation to be complete.
Installing the strike plate and applying lubricant
Installing the strike plate correctly is essential for the door to close properly:
- Align the strike plate with the latch on the door frame.
- Use screws to secure the strike plate in place.
- Make sure the door latch catches smoothly in the strike plate.
- Apply a small amount of lubricant to ensure the latch moves easily.
This will help your door open and close without a hitch and extend the life of the lock.
Tips for regular lock maintenance
Regular maintenance keeps your lock working well over time:
- Check screws regularly to ensure they are tight.
- Clean the lock with a damp cloth to remove dust.
- Use lubricant once a year to keep the lock turning smoothly.
- If the lock sticks, check for alignment issues and adjust as needed.
By following these simple maintenance tips, you can keep your door lock in good condition for years to come.





Leave a Reply