How to Remove Lawnmower Blade: Quick & Safe DIY Guide
Introduction to Lawnmower Blade Removal
Maintaining your lawnmower is essential for keeping your yard looking its best. One of the most common tasks in lawnmower upkeep is removing the blade. Whether you need to sharpen it, replace it, or just inspect it for damage, knowing how to remove lawnmower blade is a crucial skill. This guide will walk you through the process step by step, ensuring that you can do it quickly and safely. By following these instructions, you’ll be able to keep your mower in top condition and extend its lifespan. We’ll cover the tools you need, safety precautions, and the detailed steps for removal. Let’s get started!
Gathering the Necessary Tools
Before you begin, it’s important to gather all the tools you will need. The right tools make the job easier and safer. You will need a socket wrench, a block of wood, work gloves, and possibly a blade removal tool if your mower has a specific mechanism. Make sure your socket wrench fits the bolt on the mower blade. A block of wood will help stabilize the blade and prevent it from turning during the removal process. Work gloves are essential to protect your hands from sharp edges and potential cuts. If you have a blade removal tool, this can simplify the process even further. Once you have all the tools, you’re ready to move on to the next step.

Ensuring Safety Before Starting
Safety should always be your top priority when working with any power tool. Start by disconnecting the spark plug wire to ensure the mower cannot accidentally start. This is a critical step that prevents any unexpected engine starts, which could lead to serious injury. Next, place the mower on a flat, stable surface, such as a workbench or a set of blocks. This will give you better access to the underside of the mower and make the process more manageable. Wear your work gloves to protect your hands from sharp edges and debris. Finally, take a moment to inspect the area around the mower to ensure there are no tripping hazards or other risks. With these safety measures in place, you can proceed with confidence.
Accessing the Mower Blade
To access the mower blade, you need to turn the mower on its side. However, it’s important to do this correctly to avoid spilling oil or fuel. Always tip the mower so that the carburetor and air filter are facing up. This prevents oil from entering the cylinder and causing damage. Once the mower is on its side, locate the blade. You should see a large bolt in the center that holds the blade in place. This is what you will need to remove. Take a moment to inspect the blade for any signs of wear, damage, or dullness. If the blade is damaged, it may be time to replace it rather than just sharpening it. With the blade in sight, you’re ready to move on to the next step.
Stabilizing the Blade
Stabilizing the blade is a crucial step to prevent it from rotating while you loosen the bolt. Place the block of wood between the blade and the mower deck. This will create a secure point of contact and stop the blade from moving. Ensure the block is positioned firmly and does not slip. If the blade still moves, you may need to use a second block or apply more pressure. Once the blade is stable, you can proceed to the next step. Stabilization is key to making the removal process smooth and safe, so take the time to get it right.

Removing the Bolt
With the blade stabilized, you can now use the socket wrench to remove the bolt. Fit the wrench over the bolt and turn it counterclockwise to loosen it. If the bolt is rusted or stuck, you may need to apply some penetrating oil and let it sit for a few minutes before trying again. Apply steady, firm pressure to the wrench, but avoid using excessive force, as this could strip the bolt. Once the bolt is loose, you can remove it completely. Keep the bolt and any washers in a safe place, as you will need them when reattaching the blade. With the bolt removed, the blade should now be free to slide off the spindle. Gently pull the blade away from the mower, being careful not to cut yourself on the sharp edges.
Inspecting and Cleaning the Blade
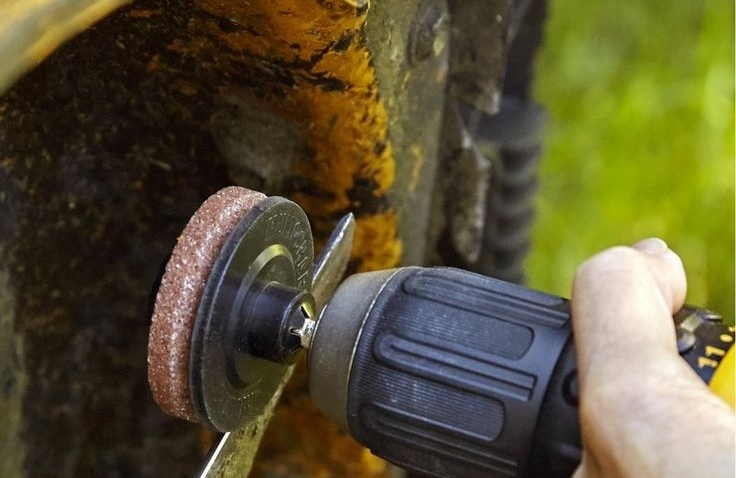
Once the blade is removed, it’s a good idea to inspect it for any signs of damage or wear. Look for nicks, dents, or bends. If the blade is bent, it may need to be straightened or replaced. If it’s just dull, you can sharpen it. Use a file or a grinder to sharpen the blade, following the original angle. After sharpening, balance the blade on a nail to ensure it’s evenly balanced. An unbalanced blade can cause vibration and uneven cutting. Clean the blade with a wire brush to remove any dirt, grass, or rust. A clean blade will perform better and last longer. Once the blade is inspected, cleaned, and sharpened, you’re ready to reattach it.
Reattaching the Blade and Final Steps
To reattach the blade, follow the removal steps in reverse. Slide the blade back onto the spindle, ensuring it’s aligned correctly. The cutting edge should face the ground, and the curved part should face the mower. Replace the bolt and any washers, and tighten the bolt clockwise. Use the socket wrench to tighten the bolt securely, but avoid over-tightening, as this could damage the threads. Once the blade is reattached, lower the mower back to its upright position. Reconnect the spark plug wire and test the mower to ensure everything is working properly. With the blade successfully removed and reattached, your mower is now ready for its next use. Regular maintenance like this will keep your mower in top condition and ensure a beautiful, well-manicured lawn.

Conclusion
By carefully following these steps, you can confidently and safely remove and replace the blade on your lawnmower. This straightforward maintenance task is essential for keeping your lawn looking its best, with a beautifully manicured appearance. Ensuring that your mower’s blade is sharp and in good condition not only improves the quality of the cut but also promotes healthier grass growth by preventing the tearing and damage that can occur with a dull or damaged blade.
Before you begin, make sure to gather all the necessary tools, such as a socket wrench, a block of wood, and possibly a new blade if you are replacing it. It’s also crucial to prioritize safety: disconnect the spark plug to prevent accidental starts, and wear protective gloves and eyewear to safeguard yourself from any potential injuries.
Once you have removed the old blade, inspect it for any signs of wear, such as nicks, dents, or excessive rust. If the blade is in poor condition, it’s time to replace it. When installing the new blade, be sure to position it correctly, with the cutting edge facing the ground. Secure the blade tightly with the bolt, using the block of wood to hold the blade in place while you tighten it. Double-check that the blade is firmly attached before reconnecting the spark plug and starting the mower.
Regularly maintaining your lawnmower blade is a key part of lawn care, and doing it yourself can save you money and time. However, if you encounter any issues during the process, or if you’re unsure about any step, don’t hesitate to seek professional assistance. A well-maintained mower will serve you well, making your mowing experience more efficient and enjoyable. Happy mowing, and may your lawn always look its best!




Leave a Reply