The Importance of Weeders: Cultivating Healthy Gardens
Gardening is a rewarding hobby that connects us with nature, provides fresh produce, and creates beautiful outdoor spaces. However, maintaining a thriving garden requires diligent care, and one of the most critical tasks is weed control. While herbicides offer a chemical solution, many gardeners prefer a more natural and sustainable approach. This is where weeders come into play. Weeders are essential gardening tools designed to remove unwanted plants efficiently and effectively. In this article, we will explore the different types of weeders, their benefits, and how to choose the right tool for your garden.
Understanding Weeds and Their Impact
Weeds are unwanted plants that compete with cultivated crops for water, sunlight, and nutrients. They can quickly overtake a garden, hindering plant growth, reducing yields, and creating an unsightly mess. Some weeds are also hosts for pests and diseases, further compromising the health of your garden.
Regular weeding is crucial for maintaining a healthy garden ecosystem. It helps to prevent the spread of weeds, conserves water, and improves soil quality. By removing weeds, you encourage the growth of desired plants and create a more aesthetically pleasing garden.
Types of Weeders
There are various types of weeders available, each designed for specific weeding tasks. Let’s explore some of the most common options:
Hand Weeders
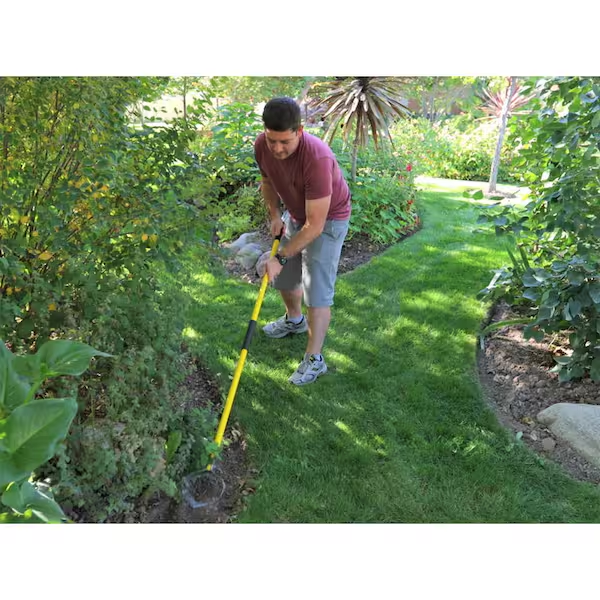
Hand weeders are versatile tools suitable for small gardens and delicate plants. They typically feature a long handle and a sharp, pointed blade.
- Hoes: These are classic hand weeders with a flat blade attached to a long handle. They are ideal for shallow cultivation and removing young weeds.
- Cultivators: Similar to hoes, cultivators have multiple tines for loosening soil and uprooting weeds. They are effective for breaking up soil crusts and aerating the garden.
- Dutch hoes: These hand weeders have a triangular blade that efficiently cuts through weeds at the soil line. They are excellent for removing weeds between rows of plants.
- Weeder forks: Featuring a fork-like head, weeder forks are designed to loosen soil and extract weeds with deep roots. They are particularly useful for removing stubborn weeds like dandelions.
Rotary Weeders
Rotary weeders are powered tools that use rotating blades to cut through weeds. They are suitable for larger gardens and can save time and effort compared to manual weeding.
- Electric rotary weeders: These weeders are powered by electricity and offer consistent performance. They are ideal for flat surfaces and well-maintained gardens.
- Gas-powered rotary weeders: These weeders provide more power and are suitable for rough terrain and larger areas. However, they require fuel and maintenance.
Flame Weeders
Flame weeders use a flame to burn off weeds. They are effective for killing weeds quickly but require caution to avoid damaging desired plants and creating fire hazards.

Choosing the Right Weeder
Selecting the appropriate weeder depends on several factors, including the size of your garden, the types of weeds you encounter, and your personal preferences. Consider the following tips when choosing a weeder:
- Garden size: For small gardens, hand weeders are usually sufficient. Larger gardens may benefit from rotary weeders or flame weeders.
- Weed type: Different weeders are more effective against specific types of weeds. For example, weeder forks are ideal for deep-rooted weeds, while Dutch hoes excel at cutting through young weeds.
- Soil type: The type of soil in your garden can also influence your weeder choice. Heavy clay soil may require a more robust tool, while sandy soil can be easily worked with hand weeders.
- Physical abilities: Consider your physical strength and limitations when selecting a weeder. Hand weeders may be suitable for most people, while rotary weeders require more physical exertion.

Weeding Techniques
Effective weeding involves a combination of proper tools and techniques. Here are some tips for successful weed control:
- Timing: The best time to weed is after a rain or watering, when the soil is moist and weeds are easier to remove.
- Consistency: Regular weeding is essential to prevent weeds from establishing themselves. Aim to weed your garden at least once a week.
- Depth: Remove weeds completely, including the roots. This prevents them from regrowing.
- Composting: Weeds that are free of seeds can be added to your compost pile to create nutrient-rich soil.
Preventing Weeds
In addition to regular weeding, there are several preventive measures you can take to reduce weed growth:
- Mulching: Applying a layer of mulch around your plants helps to suppress weed growth by blocking sunlight.
- Crop rotation: Rotating your crops can help to disrupt the weed seed bank in your soil.
- Cover crops: Planting cover crops between growing seasons can help to smother weeds and improve soil health.

Maintenance of Weeders
Proper maintenance is essential for the longevity and efficiency of your weeder. Whether you’re using a hand tool or a motorized model, regular care will ensure it continues to perform its best.
Maintenance for Hand Weeders
Hand weeders, while simple, require basic care to maintain their effectiveness.
- Cleaning: After each use, wipe down the blade with a damp cloth to remove dirt and plant matter. This prevents rust and corrosion.
- Sharpening: Over time, the blade may become dull. Use a sharpening stone to restore its edge for efficient weed removal.
- Storage: Store your hand weeder in a dry place to prevent rust.
Maintenance for Powered Weeders
Powered weeders demand more attention to upkeep.
- Regular Inspection: Before each use, check for loose parts, damaged components, or signs of wear.
- Cleaning: After use, remove any dirt, grass, or debris from the weeder. Use a hose or pressure washer to clean the exterior, but avoid directing water directly at the engine or electrical components.
- Engine Maintenance: For gas-powered weeders, follow the manufacturer’s recommendations for oil changes, air filter replacement, and spark plug replacement.
- Blade Maintenance: Keep the blades sharp for optimal performance. Replace worn or damaged blades.
- Storage: Store your powered weeder in a dry, sheltered area.
Specific Maintenance Tips for Different Weeder Types
- Rotary Weeders: Regularly check the drive shaft and blades for wear. Ensure the safety guards are in place.
- Flame Weeders: Inspect the fuel tank for leaks. Follow safety guidelines for handling and storing propane or other fuel sources.
- Electric Weeders: Check the power cord for damage before each use. Ensure the battery is fully charged (if applicable).
General Maintenance Tips
- Read the Manual: Always refer to the owner’s manual for specific maintenance instructions.
- Wear Protective Gear: When working on your weeder, wear safety glasses, gloves, and sturdy footwear.
- Lubrication: Apply a light coat of lubricant to moving parts as recommended by the manufacturer.
- Storage: Store your weeder in a dry, secure place to protect it from the elements and prevent damage.
By following these maintenance tips, you can extend the life of your weeder and ensure it continues to perform effectively in your garden. Regular care will save you time and money in the long run.

Checking and replacing parts on stand-up weeders
Stand-up weeders are powerful tools that can significantly speed up the weeding process. To ensure optimal performance and longevity, it’s essential to regularly inspect and maintain these machines. This section will guide you through checking and replacing common parts on stand-up weeders.
Understanding Your Stand-Up Weeder
Before diving into maintenance, familiarize yourself with your weeder’s model and components. Consult the owner’s manual for detailed information on specific parts and procedures. Generally, stand-up weeders consist of the following main components:
- Engine: The power source, usually a gas engine or electric motor.
- Drive system: Transmits power to the wheels.
- Cutting mechanism: The part that removes weeds, typically blades or tines.
- Handlebars: Controls the direction and speed of the weeder.
- Wheels: Provide traction and support.
Regular Inspections
Conduct a thorough inspection of your stand-up weeder before each use. Check for the following:
- Engine or motor: Ensure there’s enough oil or coolant, and the air filter is clean. Listen for unusual noises.
- Drive system: Check for loose belts or chains. Inspect for any signs of wear or damage.
- Cutting mechanism: Examine the blades or tines for sharpness and damage. Replace worn or damaged parts.
- Handlebars: Verify that the handlebars are securely attached and adjust them for comfortable operation.
- Wheels: Check tire pressure and look for any signs of wear or damage.
Common Parts to Replace
Over time, certain parts on your stand-up weeder will wear out and need replacement. Some of the most common parts include:
- Blades or tines: Dull or damaged blades or tines reduce the weeder’s effectiveness. Replace them as needed to maintain optimal performance.
- Drive belts: Worn or damaged drive belts can cause power loss. Replace them immediately to prevent further damage.
- Spark plugs (for gas engines): Worn spark plugs can affect engine performance and starting. Replace them according to the manufacturer’s recommendations.
- Air filter: A dirty air filter restricts airflow to the engine, reducing power and increasing fuel consumption. Replace it regularly.
- Oil filter (for gas engines): Change the oil filter according to the engine manufacturer’s recommendations.
Replacement Tips
- Always refer to the owner’s manual: It contains specific instructions for replacing parts.
- Use genuine replacement parts: Using original parts ensures proper fit and performance.
- Wear protective gear: When working on your weeder, wear safety glasses, gloves, and sturdy footwear.
- Disconnect the spark plug: Before performing any maintenance on a gas-powered weeder, disconnect the spark plug to prevent accidental starting.
- Tighten bolts and nuts: Ensure all bolts and nuts are securely tightened after replacing parts.
Maintenance Schedule
To prolong the life of your stand-up weeder, establish a regular maintenance schedule. This may include:
- Daily: Check for loose bolts, damaged parts, and debris.
- Weekly: Clean the weeder thoroughly, including the engine or motor.
- Monthly: Inspect the drive system and cutting mechanism.
- Yearly: Replace worn parts, tune up the engine (if applicable), and store the weeder properly.
By following these guidelines and performing regular maintenance, you can keep your stand-up weeder in top condition and enjoy its benefits for years to come.

Weeders are indispensable tools for any gardener. By understanding the different types of weeders and employing effective weeding techniques, you can create a thriving and weed-free garden. Remember, prevention is key, so combining weeding with other weed control methods will help you achieve long-term success. With the right tools and knowledge, you can enjoy the beauty and rewards of a healthy garden.



Leave a Reply