


Fixing Noises: How to Level a Washing Machine Correctly
Understanding the Importance of a Level Washing Machine
A washing machine is an essential appliance in every modern home. However, it can become a source of immense frustration when it starts shaking violently during the spin cycle. Many homeowners ignore these vibrations, thinking they are normal. Consequently, this oversight can lead to significant damage over time. The primary reason for such chaotic movement is often an unleveled machine. Therefore, learning how to level a washing machine is a crucial skill for maintaining your appliance. This process is not just about comfort; it is about preservation. If you have recently searched for DIY washing machine repair tips, leveling should be your first step. An unbalanced washer can cause severe structural damage to the machine’s internal components. Furthermore, it can damage the flooring in your laundry room.
Additionally, the noise generated by a rocking machine can be unbearable. It disrupts the peace of your home. You might even think your floor is uneven. While that is possible, the solution is often simpler. Most of the time, the machine’s feet are not adjusted correctly. Therefore, you must address this issue promptly. Ignoring it leads to premature wear and tear. The shock absorbers and drum bearings suffer the most. Eventually, the machine may break down completely. In this article, we will explore the detailed steps to fix this problem. We will also discuss the tools you need. Consequently, you can ensure your machine runs smoothly for years. A stable machine cleans clothes better. It also operates much more quietly. Thus, let us dive into the mechanics of leveling your appliance effectively.
Diagnosing the Signs of an Unleveled Washer
Before you grab your tools, you must confirm the problem. Recognizing the signs of an unbalanced machine is straightforward. First, listen to the machine during a wash cycle. Does it make loud banging or thumping noises? These sounds often indicate that the drum is hitting the sides of the cabinet. Furthermore, watch the machine during the spin cycle. If it walks across the floor, it is definitely not level. This “walking” phenomenon is dangerous. It can rip vinyl flooring or scratch tiles. Consequently, you need to act immediately.
Moreover, uneven washing results can also signal a problem. The agitator needs a level plane to function correctly. If the machine is tilted, clothes may clump on one side. This creates an off-balance load. As a result, the machine may stop mid-cycle to prevent damage. You might also notice excessive foaming or poor rinsing. These are secondary effects of the drum not sitting right. Therefore, diagnosing the issue involves using your ears and eyes. Place a level on top of the machine. Check the bubble. Is it perfectly centered? If it drifts to one side, you have work to do. You can also try rocking the machine with your hands. If it wobbles even slightly, the feet need adjustment. Consequently, early detection prevents costly repairs down the road. Do not wait until a part breaks.
Gathering the Necessary Tools for the Job
Preparation is the key to any successful DIY project. You do not need a professional toolkit to level a washer. However, having the right items makes the job much easier. First and foremost, you need a spirit level. A standard torpedo level is sufficient. However, a larger 24-inch level provides more accuracy. You will place this tool on top of the machine. Therefore, ensure it is clean and calibrated. Second, you need an adjustable wrench. This tool is essential for loosening and tightening the locking nuts on the machine’s feet. Ensure the wrench opens wide enough to fit the nuts.
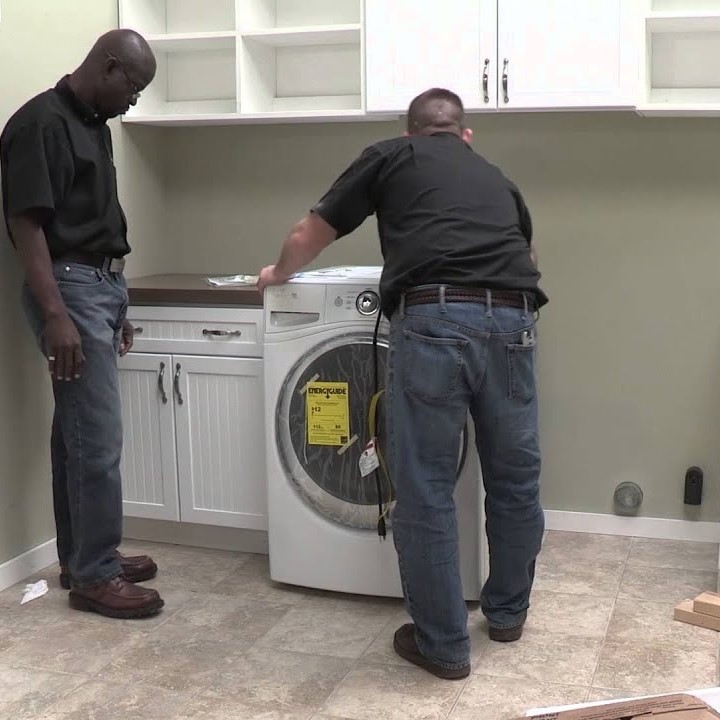
Additionally, a helper can be very useful. Washing machines are heavy appliances. Trying to tilt it yourself while adjusting the feet can be back-breaking. Therefore, ask a friend or family member for assistance. They can hold the machine steady while you work. Furthermore, have a piece of carpet or a towel ready. You will need to lay this on the floor. It protects your flooring when you tilt the machine backward. It also prevents the machine from scratching the floor as you slide it. Lastly, a tape measure is helpful. You might need to measure the distance from the floor to the bottom of the machine. This ensures equal clearance on all sides. Gather these items before you begin. Consequently, the process will go smoothly without interruptions. Being prepared saves time and frustration.
Preparing the Area and Safety Precautions
How to level a washing machine? Safety must always be your priority. A washing machine uses electricity and water. These two elements do not mix well. Therefore, you must disconnect the power supply before touching the machine. Unplug the cord from the wall outlet. Do not rely on simply turning the machine off. A physical disconnection is the only safe method. Furthermore, you need to turn off the water supply valves. You will find these valves on the wall behind the machine. Turn the handles clockwise until they stop. This prevents accidental flooding. Once the water is off, disconnect the hoses from the machine. Use a bucket to catch any water remaining in the hoses.
Consequently, you will have a dry and safe workspace. Next, pull the machine away from the wall. You need enough space to work behind and around it. Be careful not to scratch the floor. You can place a drop cloth or cardboard under the machine. This protects the flooring. Additionally, check the floor itself. Is it uneven? If the floor is slanted, the leveling process will be harder. You might need to build up one side. However, most laundry room floors are relatively flat. Ensure the area is well-lit. You need to see the leveling feet clearly. Also, ensure the drum is empty. Do not attempt to level a machine full of wet clothes. The added weight throws off your measurements. Therefore, clear the drum completely. These preparations ensure your safety and success.
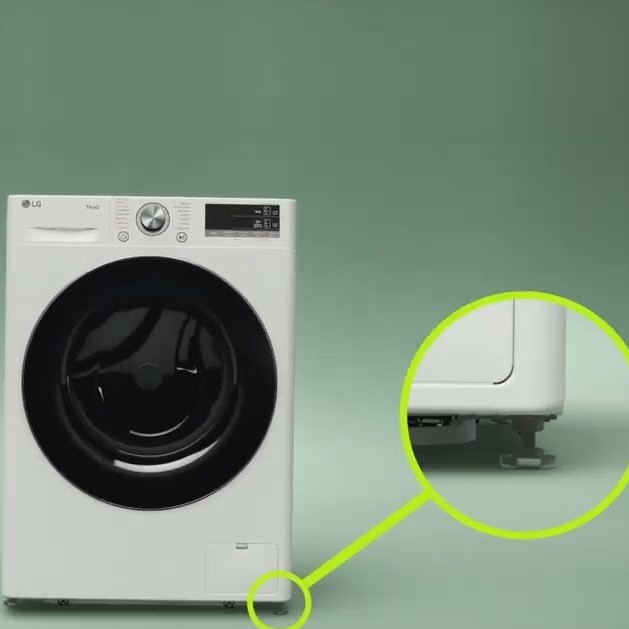
Adjusting the Front Leveling Legs
How to level a washing machine? Most washing machines have four adjustable legs. The front two are usually the most accessible. Many modern machines have self-leveling back legs. However, the front legs always require manual adjustment. Start by locating the locking nuts on the front legs. These nuts are usually made of metal or plastic. They sit flush against the bottom of the machine cabinet. You must loosen these nuts first. Use your adjustable wrench to turn them counter-clockwise. Loosening them allows the leg to spin freely. Consequently, you can change the height.
Once the nuts are loose, you can adjust the length of the legs. Turn the leg clockwise to shorten it. Alternatively, turn it counter-clockwise to lengthen it. You often need to lift the machine slightly with your hand or a pry bar to allow the leg to extend. Therefore, ask your helper to tilt the machine back. Adjust both front legs until the machine seems stable. Then, place your spirit level on the front edge of the machine. Check the bubble. Is it centered? If not, adjust the legs further. You might need to shorten one side and lengthen the other. This process requires patience. Do small adjustments at a time. Once the front is level, you must tighten the locking nuts. Push them up firmly against the cabinet. This secures the height setting. A loose nut will vibrate loose over time. Therefore, ensure they are tight.
Handling the Rear Leveling Legs
How to level a washing machine? The rear legs can be tricky. Some machines have self-leveling rear legs. These legs adjust automatically when you tilt the machine. However, they can get stuck or rusty. Therefore, you should check them regardless. If your machine has manual rear legs, the process is similar to the front. You need to tilt the machine forward. Place a block of wood or a sturdy object underneath to hold it up. This gives you access to the back legs. Use your wrench to loosen the locking nuts. Then, screw the legs in or out as needed.
For machines with self-leveling legs, you need to release the mechanism. Tilt the machine forward until the back legs extend fully. Then, gently set the machine back down. The legs should adjust to the floor’s contour. However, sometimes this mechanism fails. You might need to manually lubricate the sliding parts. Silicone spray works well for this. If the rear legs are manual, measure the height of the front legs. Try to match the rear height to the front. This creates a balanced base. After adjusting, lower the machine carefully. Check the level again from side to side. Also, check it from front to back. You want the machine perfectly flat on both planes. Consequently, the drum will hang vertically. This prevents the tub from hitting the sides during the spin cycle.
Testing Stability and Final Adjustments
How to level a washing machine? After adjusting all four legs, the real work begins. You must verify your work. First, push down on the top corners of the machine. Does it rock or wobble? It should feel solid. There should be no movement. If it rocks, you need to re-adjust. A common mistake is leaving one leg slightly short. This creates a “tripod” effect where one leg does all the work. Consequently, the machine rocks. You want all four feet to bear equal weight.

Therefore, use your level one more time. Place it on the top of the machine. Check the side-to-side level first. Then, check the front-to-back level. The bubble should be perfectly centered in the vial. If it is slightly off, fine-tune the legs. Furthermore, perform a “manual spin test.” Open the lid or door. Spin the drum by hand. Does it spin freely? Does it wobble? The drum should rotate smoothly. Once you are satisfied, reconnect the water hoses. Plug the machine back into the outlet. Slide it back into its designated spot.
Be careful not to disturb the legs as you push it. You can slide it on a piece of cardboard to protect the feet. Finally, run a short test cycle. Use a medium water level. Watch the machine during the spin cycle. It should remain stationary. There should be minimal vibration. If it still shakes, you may need to check the internal components.
Dealing with Uneven Floors and Anti-Vibration Pads
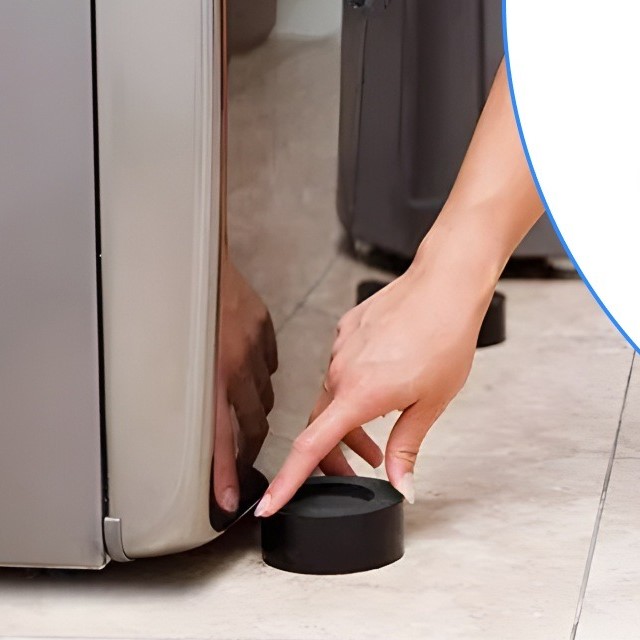
Sometimes, your floor is the problem. Older homes often have settled floors. A slanted or warped floor makes leveling difficult. In such cases, adjusting the legs might not be enough. You might extend the legs fully and still be unleveled. Therefore, you need an external solution. Anti-vibration pads are an excellent investment. These are thick rubber mats or specially designed feet. They sit under the machine’s legs. They absorb shock and vibrations. Furthermore, they can compensate for minor floor irregularities.
Additionally, you can use leveling shims. These are small, tapered plastic wedges. You slide them under the machine’s feet until it sits flat. However, shims can be unsightly. They might also slide out over time. Therefore, adhesive shims are a better option. They stay in place securely. Another solution is to build a platform. You can construct a small wooden base for the washer. This base provides a flat surface. However, ensure the base is anchored to the wall. You do not want the machine to vibrate off the platform. Heavy-duty anti-vibration pads are the easiest fix. They also reduce noise transmission to the rest of the house. Consequently, they protect your floor from scratches. They are a small investment for a major improvement in stability.
Maintenance Tips to Keep Your Washer Balanced
Leveling your washing machine is not a one-time task. Over time, the machine can settle. The vibrations can cause the legs to shift. Therefore, you should check the level periodically. A good rule of thumb is to check it every six months. This ensures early detection of any issues. Furthermore, inspect the locking nuts. They can loosen due to constant vibration. Tighten them if necessary. This maintains the height setting.
Moreover, pay attention to how you load the machine. An unbalanced load can mimic a leveling problem. Do not wash a single heavy item, like a rug, by itself. The drum will wobble violently. Instead, wash heavy items with other heavy items. This balances the weight distribution. Additionally, clean the area under the washer. Dust and lint can accumulate under the feet. This buildup can act like a shim. It creates an uneven surface. Therefore, move the machine occasionally and sweep the floor. Also, check the water hoses. Old hoses can bulge or leak. A leaky hose can rot the flooring underneath. This leads to a soft, uneven floor. Consequently, the machine will sink. Replace your hoses every five years. These simple maintenance steps keep your machine stable. They extend the life of your appliance significantly.
When to Call a Professional Technician
Sometimes, leveling the machine does not solve the problem. You might have perfectly leveled the cabinet. Yet, the machine still shakes violently. In this case, there might be internal damage. The internal shock absorbers could be broken. These dampers control the movement of the drum. If they fail, the drum will bang around. Furthermore, the suspension springs might be stretched or detached. These components hold the drum in place. You cannot fix these issues with a wrench.
Therefore, it is time to call a professional technician. Attempting to repair internal components yourself can be dangerous. The drum is very heavy. It can crush fingers if it falls. Furthermore, the electrical systems are complex. A qualified technician has the parts and expertise. They can diagnose the root cause quickly. Another sign of internal failure is leaking. If you see water under the machine after leveling, stop using it. There could be a crack in the tub. Also, listen for grinding noises. This indicates bearing failure. Bearings are difficult to replace. It is often cheaper to buy a new machine. Therefore, know your limits. Leveling is a DIY job. Internal repairs usually require professional help.
FAQ: Your Top Questions Answered
How do you fix an uneven washing machine?
You fix an uneven machine by adjusting the leveling legs. First, disconnect the power. Then, loosen the lock nuts on the feet. Screw the legs in or out until the machine is level. Use a spirit level on the top lid to check accuracy. Finally, tighten the lock nuts to secure the feet.
Do washing machines need to be leveled?
Yes, washing machines absolutely need to be leveled. A level machine operates quietly and efficiently. It prevents the drum from hitting the sides. It also protects the internal components from damage. Furthermore, it prevents the machine from “walking” across the floor.
How to level a washing machine on an uneven floor?
If the floor is uneven, you have options. You can use anti-vibration pads or rubber mats to compensate. Alternatively, you can use shims under the low feet. For severely uneven floors, building a leveled platform is the best solution. This provides a flat base for the machine.
How to fix washing machine level?
To fix the level, you must adjust the feet. Tilt the machine back to access the legs. Use a wrench to turn the feet. Extend the leg on the low side. Retract the leg on the high side. Check with a level tool frequently. Tighten all hardware once the bubble is centered.
Conclusion: Enjoying a Quiet and Efficient Laundry Room
A smooth-running washing machine makes household chores much easier. You no longer have to dread the noise of the spin cycle. By following this guide, you have learned how to level a washing machine effectively. This DIY task saves you money on repairs. It also extends the life of your valuable appliance. Remember that stability is key. You must ensure all four feet touch the ground firmly. Consequently, the vibrations will disappear. Do not forget to check the machine regularly. Maintenance is ongoing. If you face issues beyond leveling, call a pro. However, most shaking issues are solved with a simple adjustment. Grab your level and wrench today. Restore peace to your laundry room. You will be surprised at the difference a few turns of a wrench can make. Enjoy the quiet and the clean clothes.